Amazon Seller Registration: How to Register as a Seller on Amazon?
Amazon is the world’s biggest online marketplace, where crores of people daily shop. If you also want to start your business online or want to grow your existing business, then Amazon seller registration can be a smart decision.
In this blog, we will guide you on the process of Amazon seller registration step-by-step so that you can start your online store on Amazon without any interruption. Whether you are a small business owner or a large-scale manufacturer. Amazon gives you the best platform to reach worldwide customers.
What is Amazon?
In today’s digital era, Amazon is the world’s biggest e-commerce company which works in online shopping, cloud computing, artificial intelligence, streaming services, and many different industries. It is a global brand that provides products and services every day to millions of customers.
If you do online shopping or thinking to start an online business, then Amazon is the platform that is the best option for both buyers and sellers. After doing Amazon seller registration you can sell your products on Amazon and can expand your business worldwide.
Why Should You Sell on Amazon?
Nowadays every customer prefers online shopping, and by registering as an Amazon seller registration you can get your chance to make your products reach millions of customers. Here small business owners, wholesalers, manufacturers, and resellers can easily sell their products.
Let’s see what are the benefits to sell on Amazon and how they are helpful for your business.
1. Reach to Worldwide Customers
Amazon has a global reach, in which millions of active buyers shop every day. After Amazon seller registration, your Amazon seller account becomes active, from which you can sell your products to worldwide customers.
2. Low Investment, High Returns
To sell on Amazon is cheap and more profitable than traditional businesses. Amazon seller registration is free and you can step your store on Amazon without any bigger investment. From Amazon Seller Central you can see your sales report and growth analytics.
3. Benefit of Amazon FBA (Fulfillment by Amazon)
If you do not want to take any tension of logistics and delivery, then Amazon FBA is best for you. In this Amazon store, pack, and deliver your products, by which you can only focus on your sales and marketing. After Amazon seller registration you can also take benefit of Amazon FBA.
4. Easy Advertising and Marketing Tools
Amazon provides tools like sponsored ads, coupons, and promotions for sellers that help in increasing your sales. After Amazon seller registration you can use your Amazon ads to rank your products on top.
5. Secure Payments and Seller Protection
To sell on Amazon there is one big advantage that is here we get safe and timely payment. While doing an Amazon seller login you can check your payout details and with the use of Amazon Seller Central, you can download your payment reports.
What Products Can I Sell on Amazon?
If you are going to start an online business, then Amazon is the best platform. After completing Amazon seller registration you can make your Amazon seller account and get access of Amazon Seller Central from where you can manage your products.
But, before selling on Amazon it is important to understand that which type of products you can sell and which products need appoval.
1. Open Categories (In which you can sell without approval)
If you have created an Amazon seller account after completing Amazon seller registration, then you can list your products in these categories without any approval:
-
- Clothing and Accessories – T-shirts, kurtas, sarees, handbags, shoes, etc.
- Home and Kitchen – Dinner sets, bedsheets, kitchen tools, etc.
- Books and Stationery – Novels, notebooks, pens, office supplies, etc.
- Toys and Games – Kids toys, puzzles, board games, etc.
- Beauty and Personal Care – Makeup, skincare, haircare, grooming kits, etc.
- Sports and Fitness – Dumbbells, yoga mats, gym equipment, etc.
- Electronics Accessories – Earphones, mobile covers, chargers, cables, etc.
If you want to sell your products in these categories, then only complete Amazon seller registration, do Amazon seller login, and list your products in Amazon Seller Central.
2. Restricted Categories (Which Requires Amazon Approval)
In some categories, approval has to be taken even after Amazon seller registration. You have to submit your documents on Amazon Seller Central.
-
- Grocery and Gourmet Foods – Packaged food, organic products, dry fruits, etc.
- Healthcare and Medicines – Ayurvedic products, supplements, medical devices, etc.
- Electronics and Appliances – Mobile phones, laptops, cameras, refrigerators, etc.
- Jewelry and Watches – Gold, silver, artificial jewelry, branded watches, etc.
- Automobile Accessories – Car covers, seat covers, helmets, lubricants, etc.
- Baby Products – Baby food, diapers, skincare, toys, etc.
If you want to sell your restricted products, then do Amazon seller login and apply for approval of Amazon Seller Central.
What Do I Need to Register as a Seller on Amazon?
In today’s digital era, the craze of online shopping is increasing day by day. Customers today prefer to shop at just one click while sitting at home, and that’s why it is profitable for your business to sell on Amazon like e-commerce platforms.
But, to start sell on Amazon you have to submit some important documents and business details. In today’s detailed guide, we will tell you the process of Amazon seller registration step-by-step so that you can start your business on Amazon without any interruption.
Important Documents and Requirements for Amazon Seller Registration
When you start selling on Amazon, then first of all you have to complete Amazon seller registration. For that, there is some need for important documents and details that Amazon verifies.
1. Select Business Type
Amazon gives options for 2 types of seller accounts. You have to select one option according to your business model:
-
- Individual Seller – If you are a small business or a freelancer and want to sell limited categories without GST.
- Business Seller – If you are running a GST-registered business and want to sell large-scale products.
If you are making a plan for long-term selling, then creating a Business seller account can be better because in this you get the benefit of selling in more categories.
2. Required Documents for Amazon Seller Registration
-
- Mobile Number and Email ID: For Amazon seller login and communication.
- GST Number (For most categories) – We can sell in some categories without GST.
- PAN Card – Personal PAN for an individual, and Company PAN for a business.
- Bank Account Details – In which your payment will be received (Account Number & IFSC Code).
- Business Address Proof – Aadhar card, electricity bill, or rent agreement.
- Product Details – If you have ready-to-sell products then make their details ready.
After submitting these documents to Amazon Seller Central, Amazon will verify your Amazon seller account.
Mistakes to Avoid When Registering as an Amazon Seller
If you are doing Amazon seller registration, then it is important to avoid some common mistakes that new sellers often make. These mistakes can delay the process or can be the reason for account rejection.
1. Selecting the wrong Business Type
Amazon offers two types of seller accounts: Individual Seller Accounts (for small businesses) and Professional Seller Accounts (for large businesses). While doing Amazon seller registration, choose the correct account type according to your business needs.
2. Giving Documents Wrong or Incomplete
Requirement of PAN Card, GST Number, Bank Account, and Address Proof for Amazon seller registration. If you submit wrong or incomplete documents, then your account can be rejected.
3. Filling the Wrong Bank Account and Tax Details
Some new sellers fill wrong bank details and GST information, due to which there is a delay in the Amazon seller registration process, and can be a problem in payments.
4. Doing Poor Product Listing
If you don’t do product listing well on Amazon, then customers won’t buy your products. After Amazon seller registration, keep these points in mind while listing your product:
-
- Use high-quality images
- Write the proper product title
- Use bullet points and SEO keywords.
5. Putting the wrong Pricing Strategy
Not paying attention to the right pricing is a big mistake. Analyze competitor pricing, be aware of Amazon fees and commissions, and use smart discounts. After completion of Amazon seller registration, optimize your price structure.
6. Ignoring Shipping and Return Policy
If you don’t follow the return and refund policy of Amazon, then you might incur losses. Use Amazon FBA (Fulfillment by Amazon) after Amazon seller registration to get hassle-free shipping.
7. Not Using Amazo Seller Central Properly
It is important to use the right Amazon Seller Central after Amazon seller registration From this platform you can manage inventory, track orders, and handle customer feedback.
8. Mistake of Creating Multiple Amazon Seller Account
Amazon doesn’t allow you to create multiple seller accounts. During Amazon seller registration you can list multiple brands from one account only, otherwise Amazon can ban your account.
9. Not Following Amazon’s Policies
Amazon has a strict policy. If you don’t follow pricing, return policy, and customer service rules, then your account can be suspended after Amazon seller registration.
How to Register as a Seller on Amazon?
To register as a seller on Amazon, follow these steps:
-
- Open the Amazon seller account registration form
1. Open your web browser and go to Amazon.in
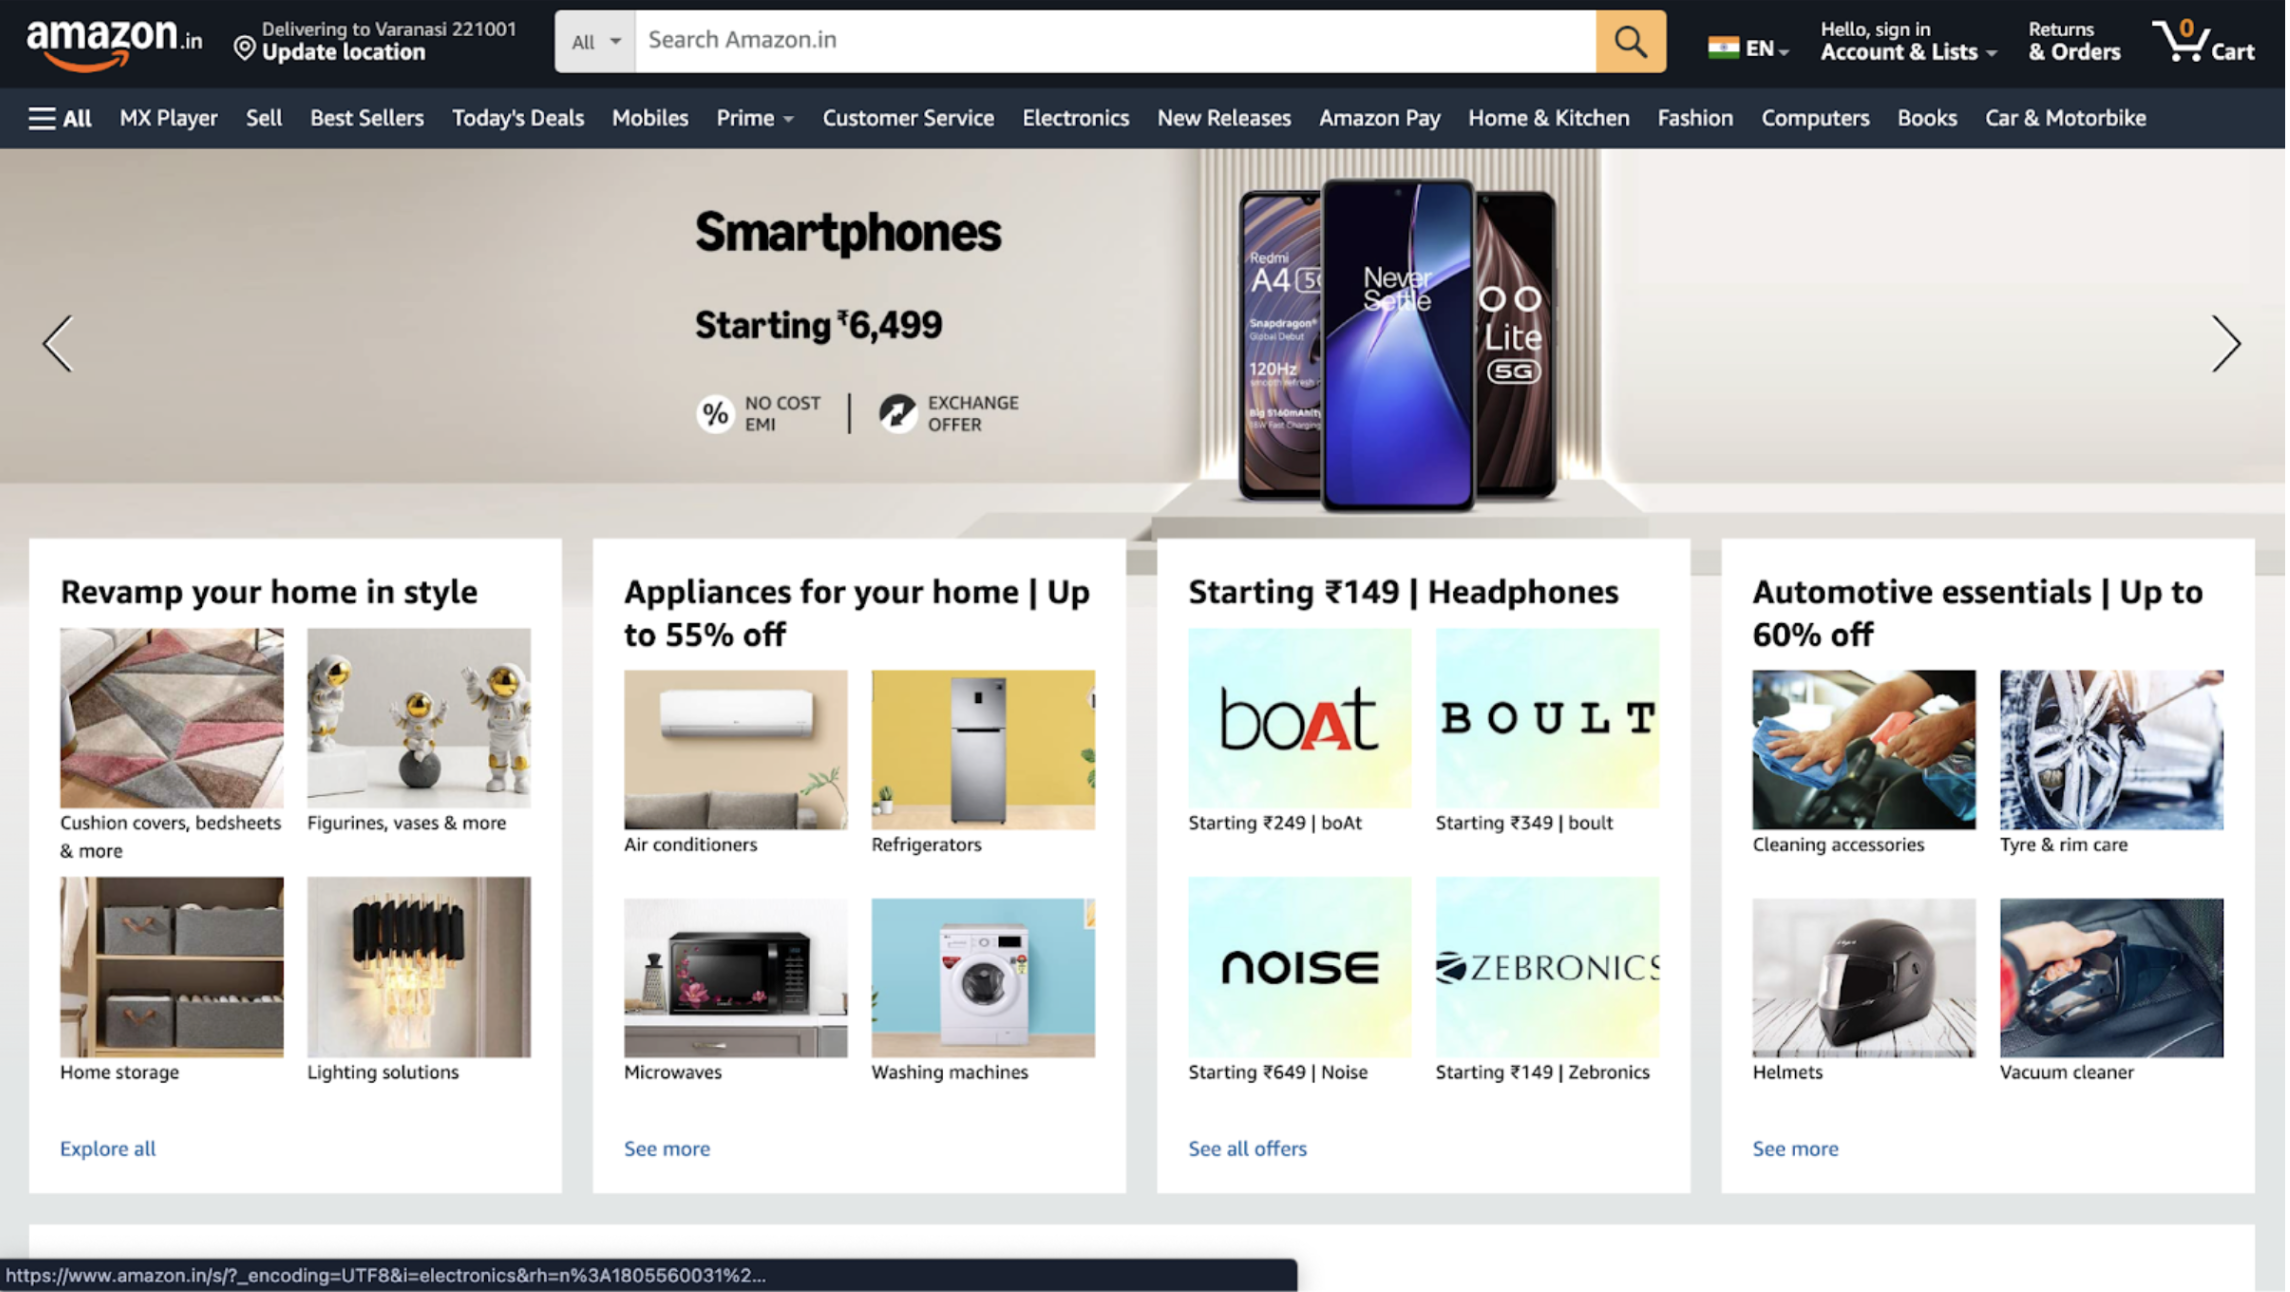
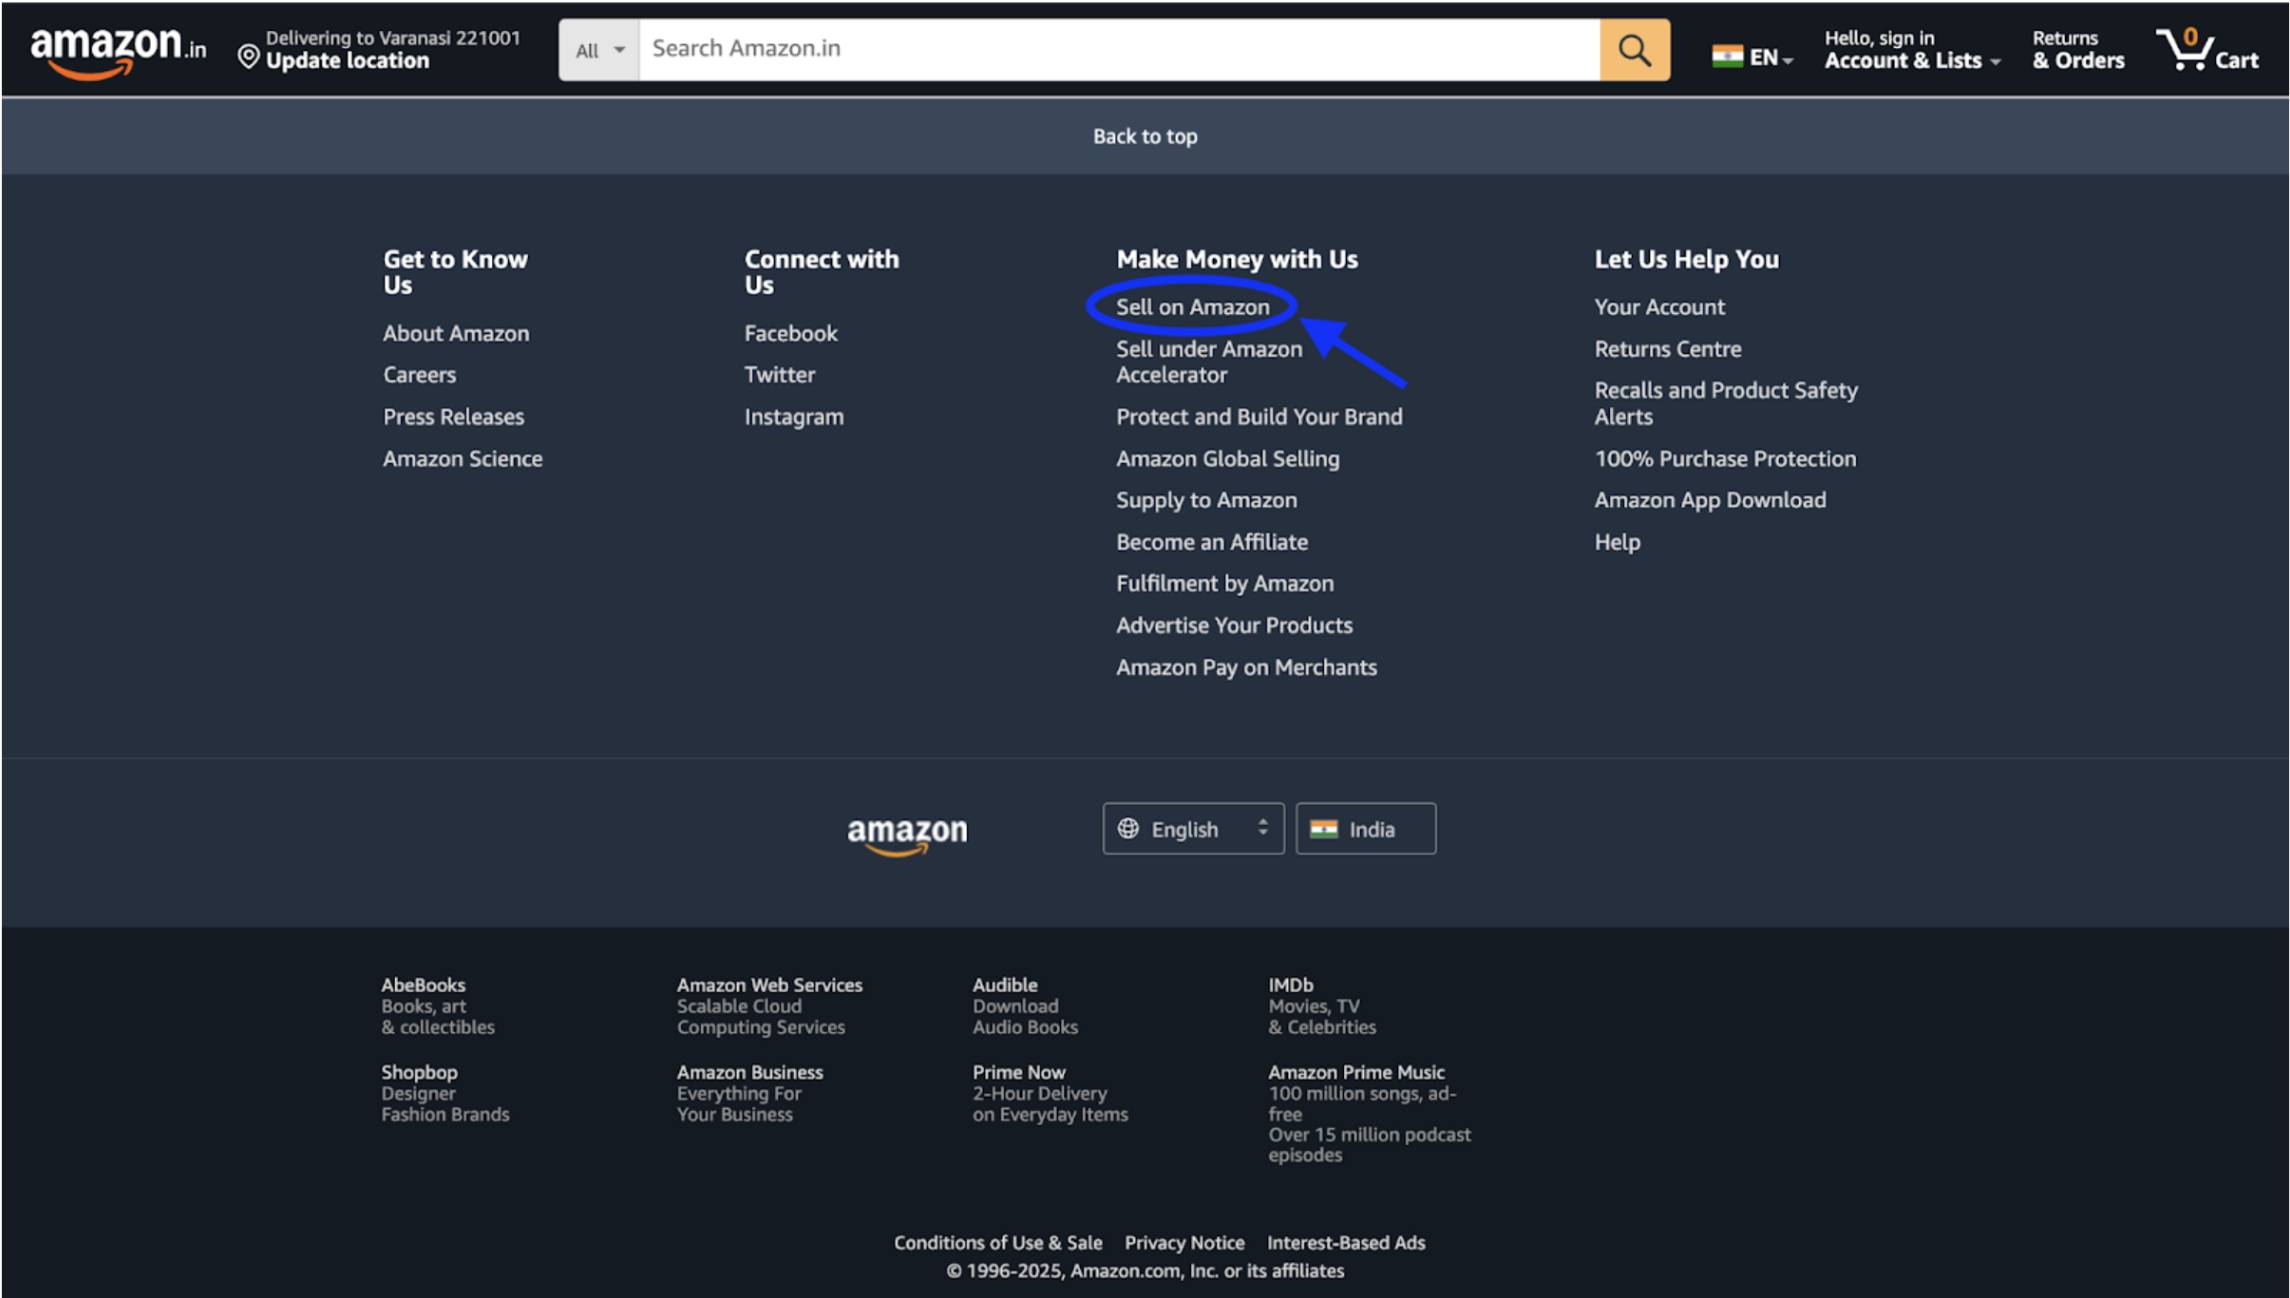
2. Scroll down and go to footer section of Amazon and click on “Sell on Amazon”
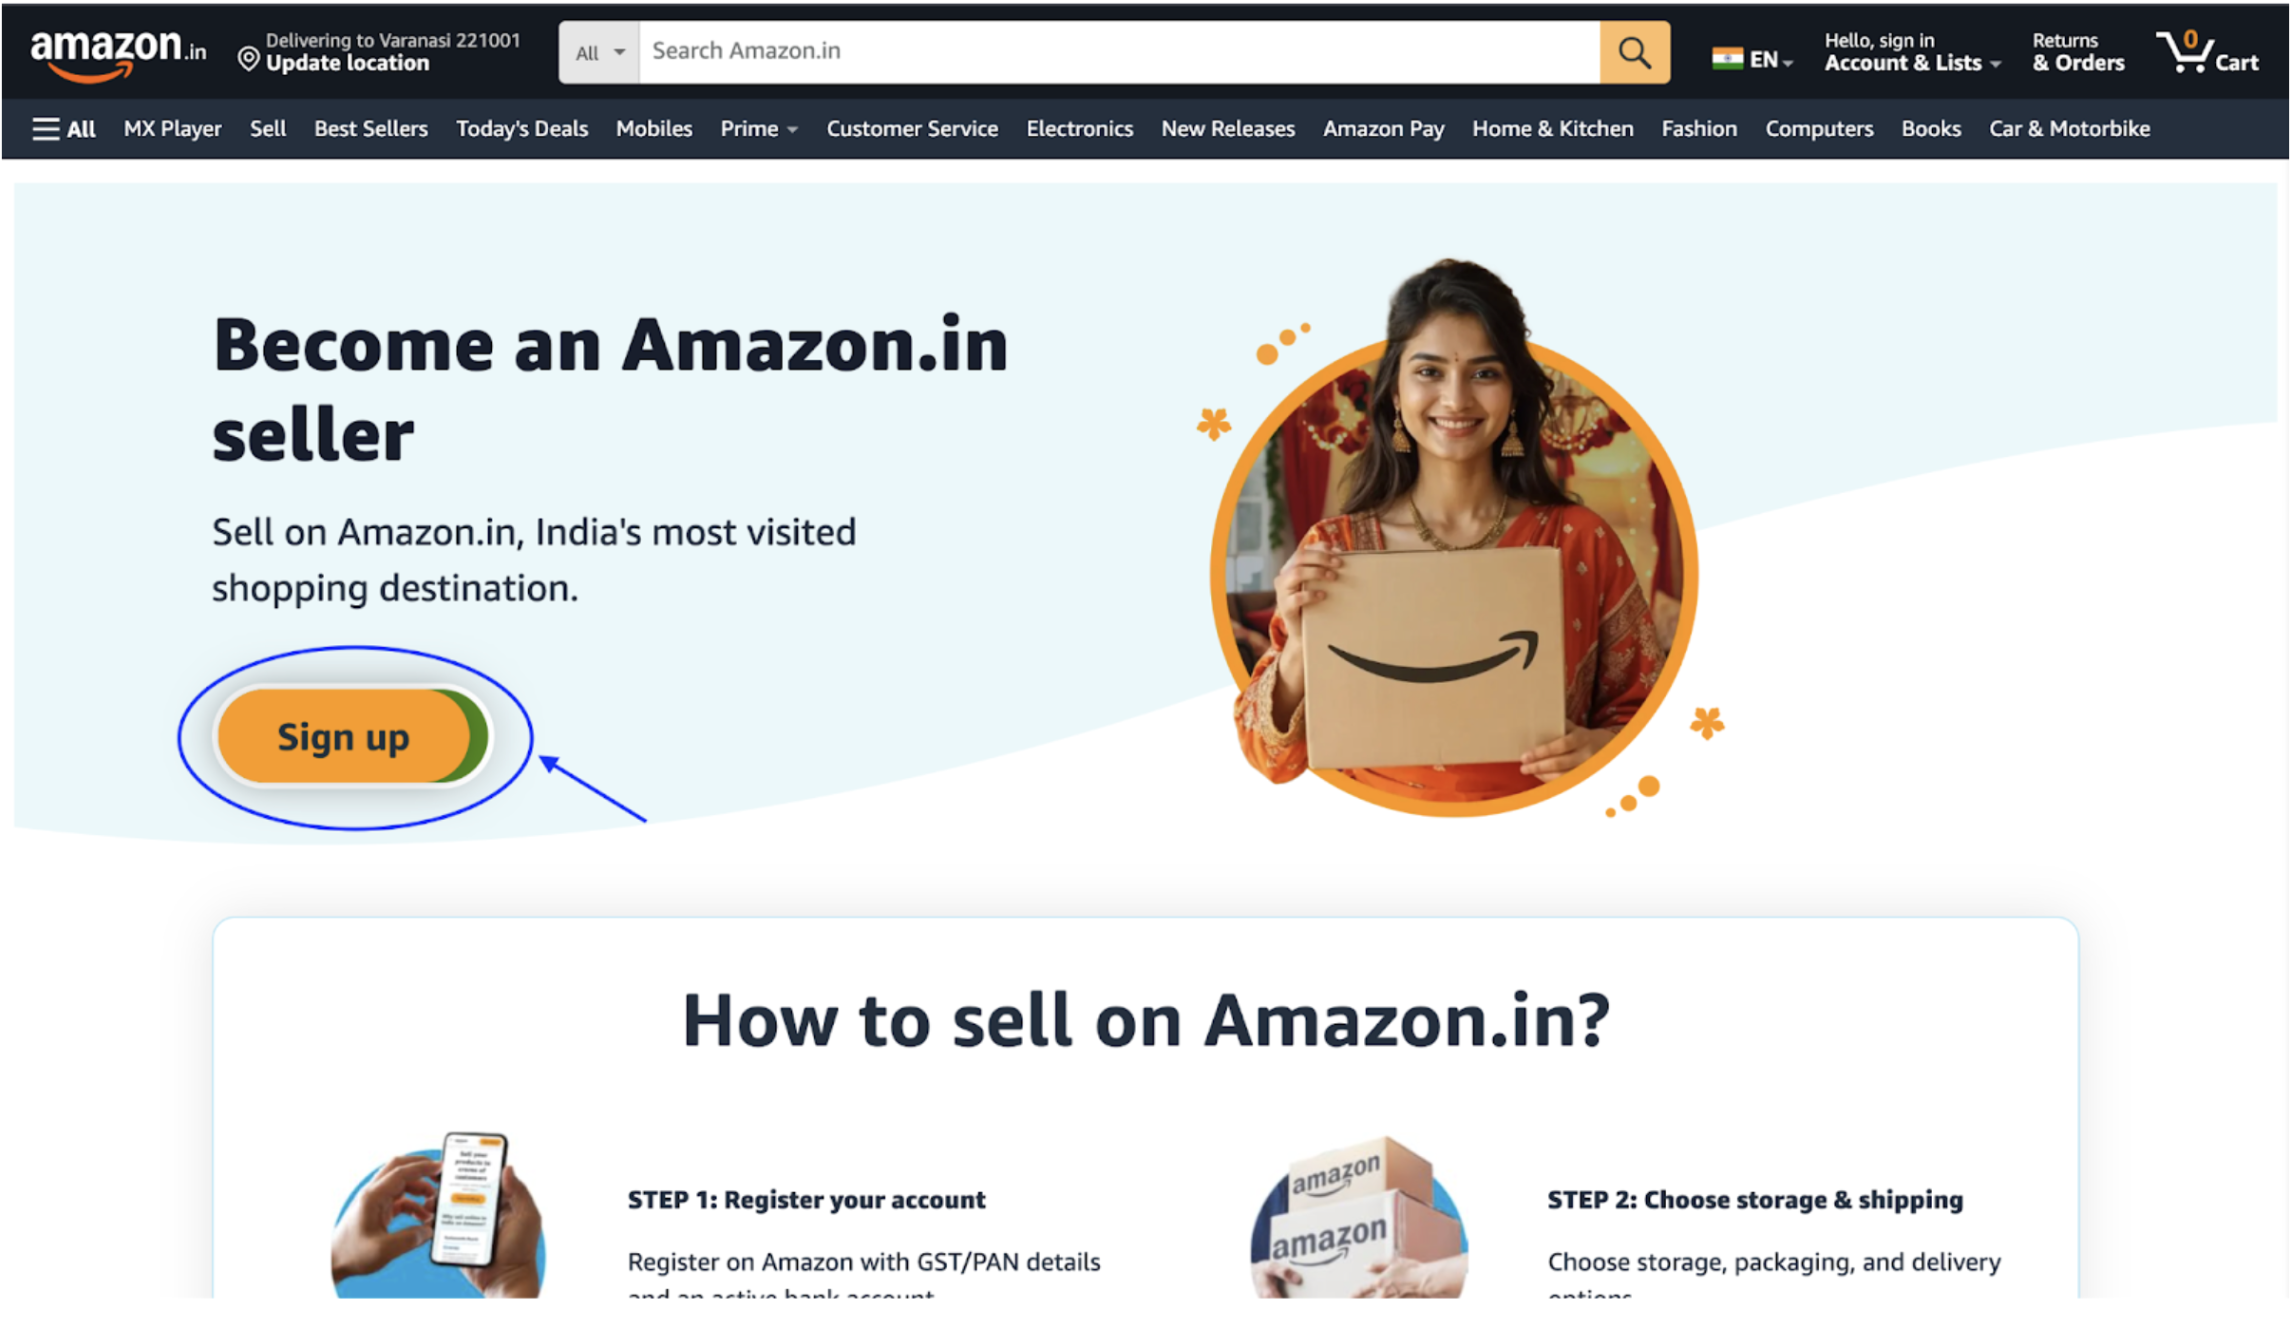
3. Now click on “Sign Up”
4. Click the “Create an Account”
Link for creating an account for Amazon is here
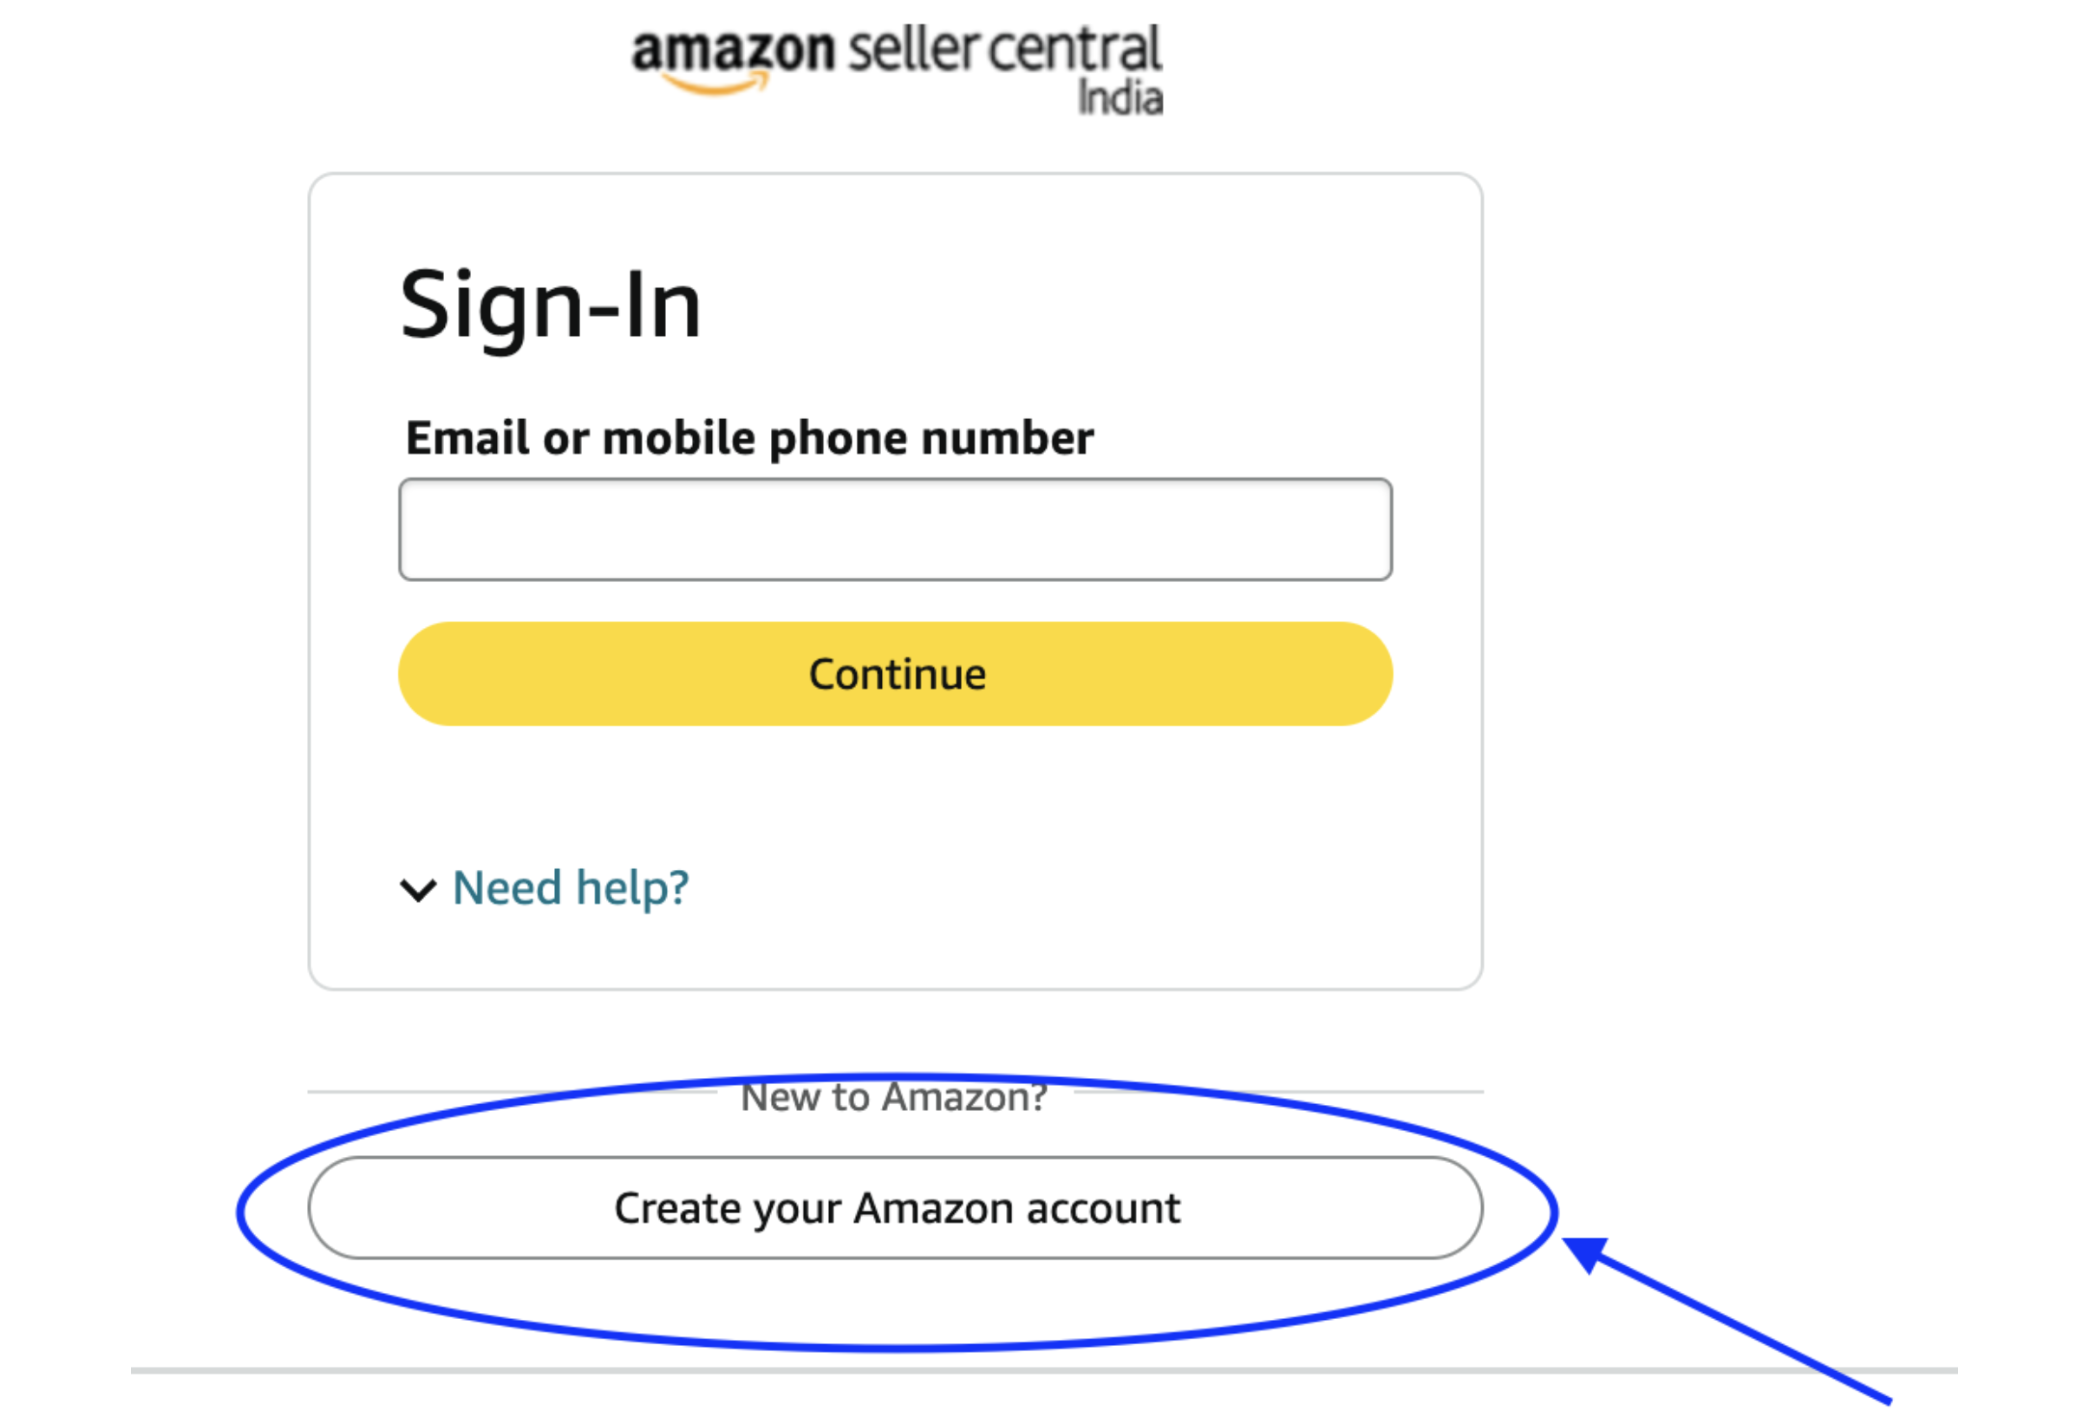
5. Fill out the required information and Submit your Application for Amazon seller registration
Step 1: Create a New Account
- Fill out the profile information – Including your name, address, phone number, and password (at least 6 characters). Click to continue.
- Enter OTP and create your new account.
- You’ll be asked to verify your phone number and email address before continuing, so confirm both of those details and click “Continue”.
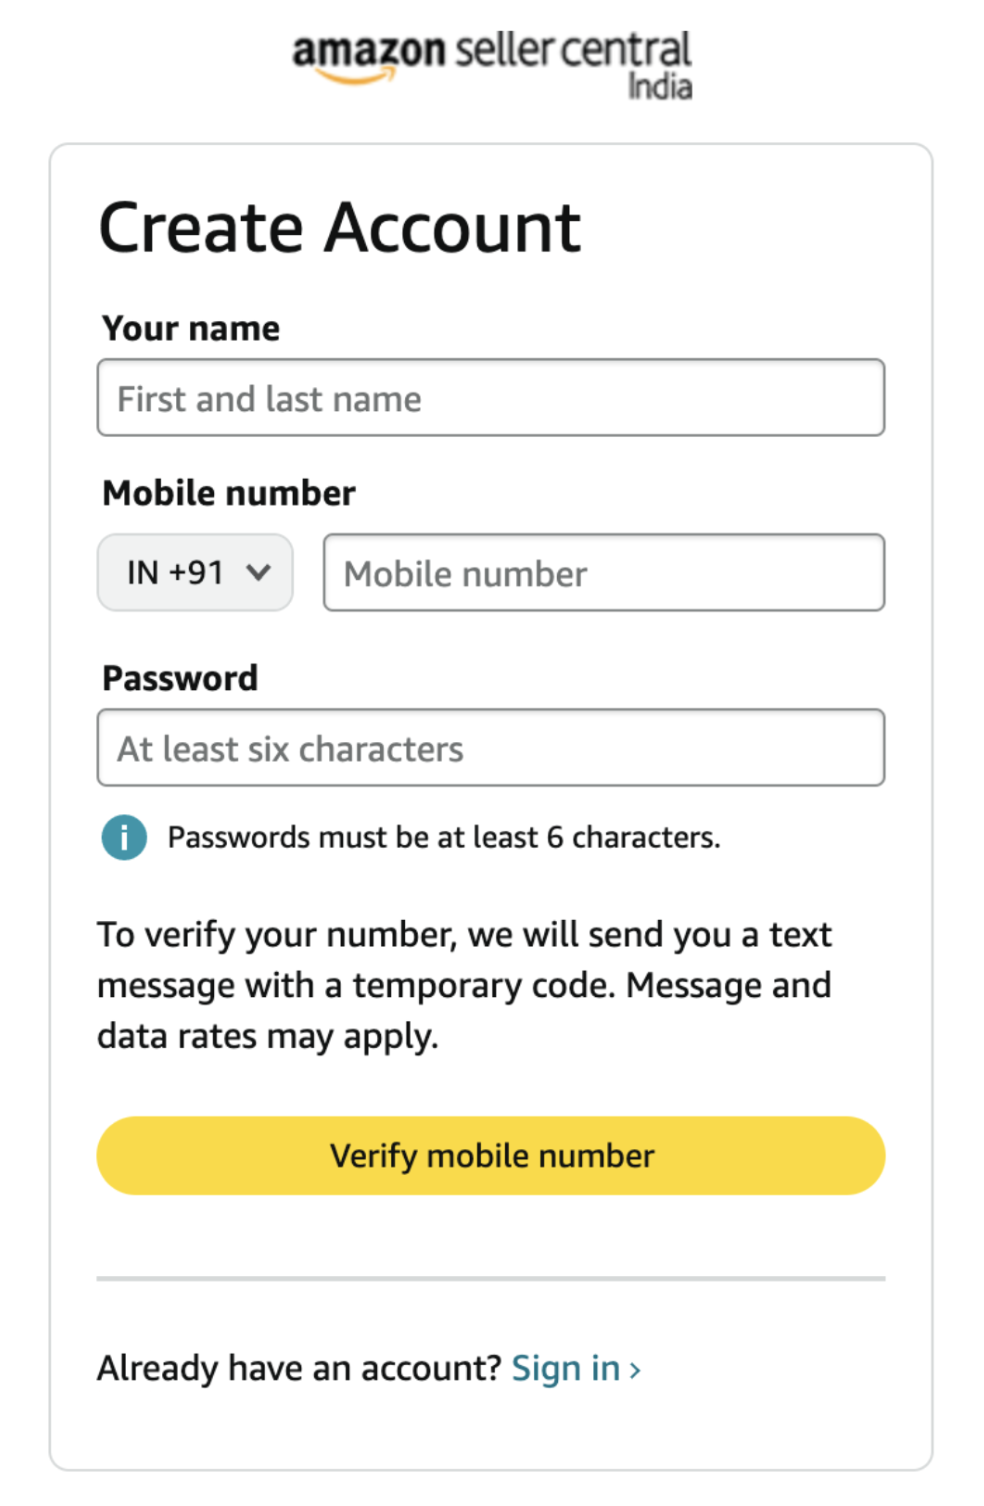 Step 2: Register and Start Selling – Submit Seller Information:
6. You’ll need to submit the following information for Amazon seller registration:
- Company name and business registration number
- GST and PAN details then click on continue
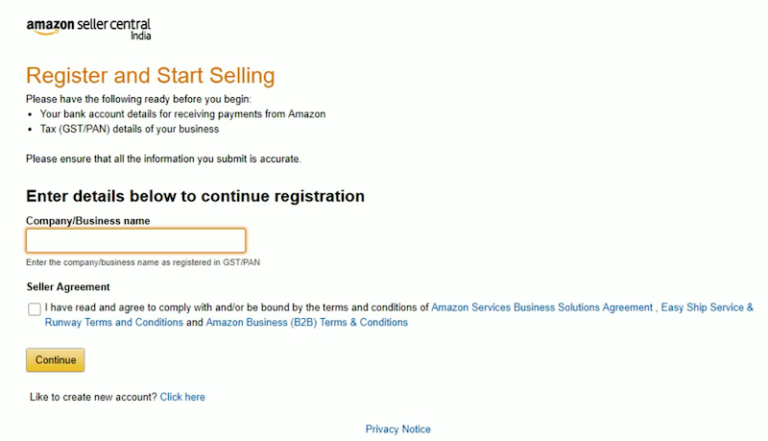
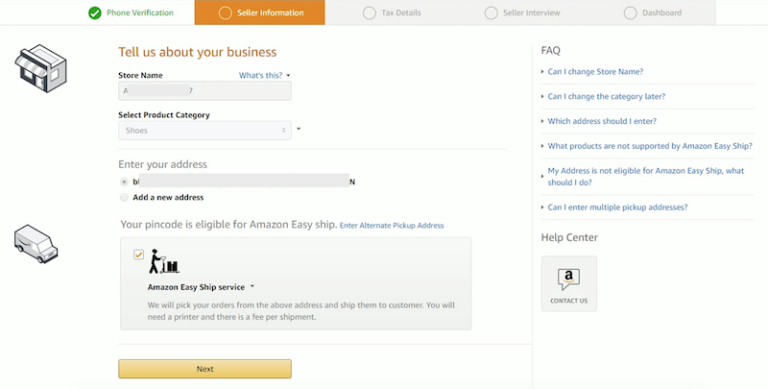
7. Verify the details submitted by you, then go to your seller central page and fill all the other information.
-
- Next, select the product you want to sell and find the “Sell on Amazon” tab in the upper right-hand corner of your screen. If it doesn’t already exist, click “Add Your Business” and fill out the form with all of your information.
- Once you complete this step, Amazon will send you a verification link that you will use to complete the second step of Amazon seller registration.
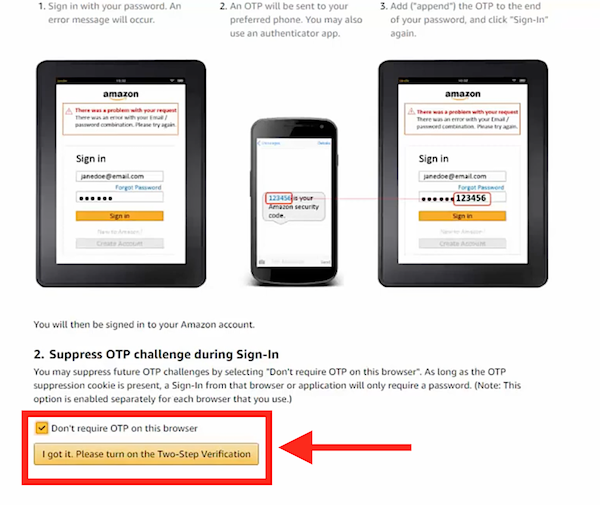
8. Two-Step Verification – It is a way to make sure that your account has been registered with us before you begin selling on it.

9. Now, you’ll need to set up two-step verification on your account and then turn on the two-step verification.
Step 3: Submit your Tax Details
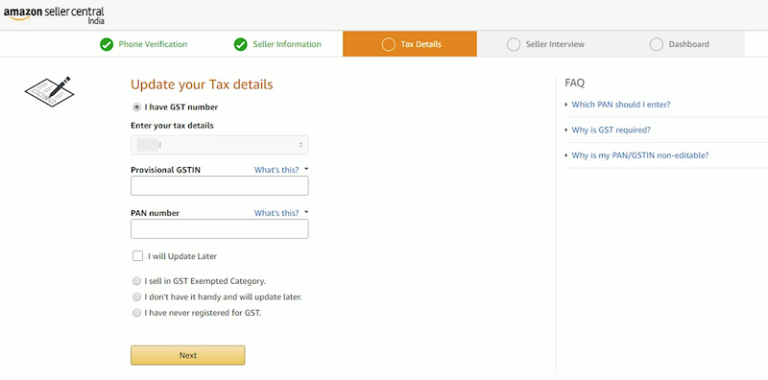
Amazon sellers are required to submit the tax details in order to register as a Amazon seller registration.
Step 4: Seller Interview:
To start it, we have to keep some important things in mind:
-
- How many products do you sell in a year?
- What’s your annual turn-over ratio?
- Do you sell your products on other websites?
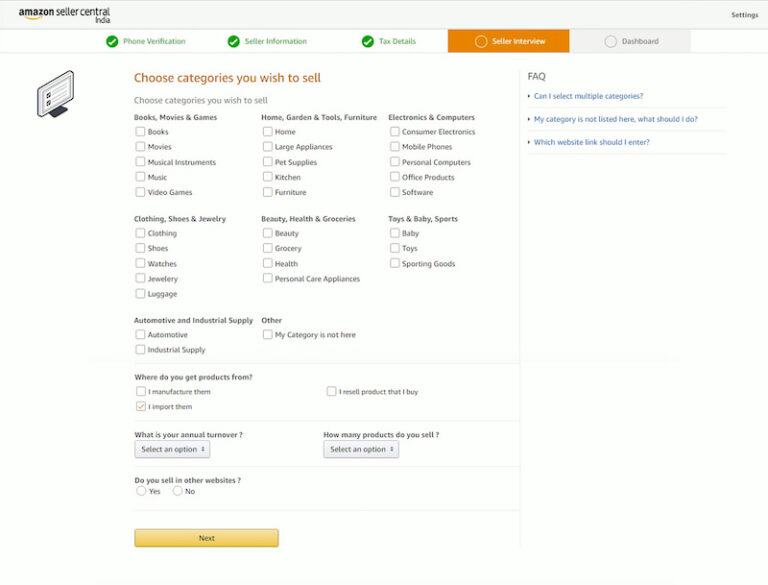
Step 5: Amazon Seller Central Dashboard
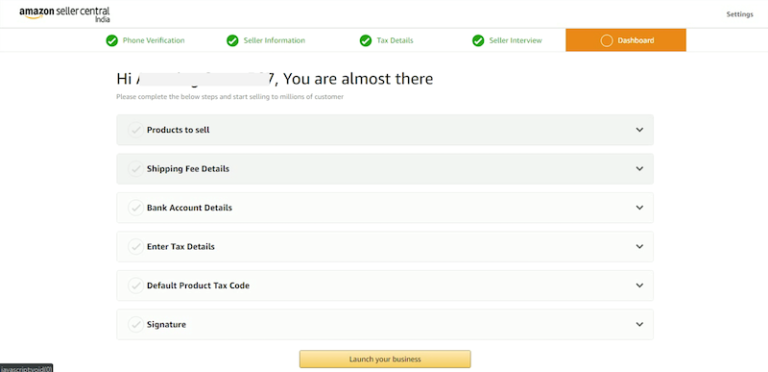
Getting started with selling on Amazon, you need to log in to your seller central account first. It can be done by clicking “My Account” link in the upper right corner of any Amazon.com page.
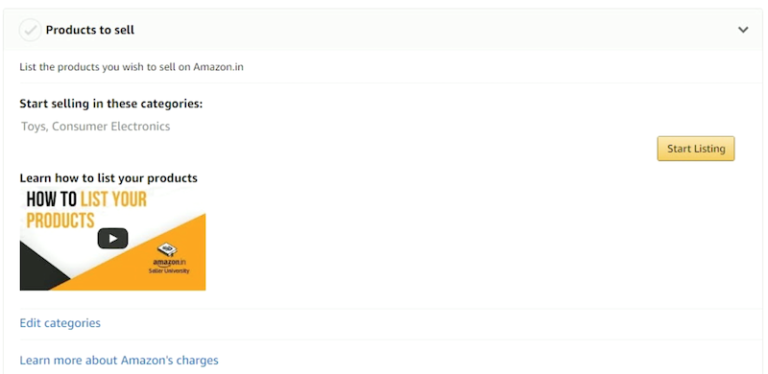
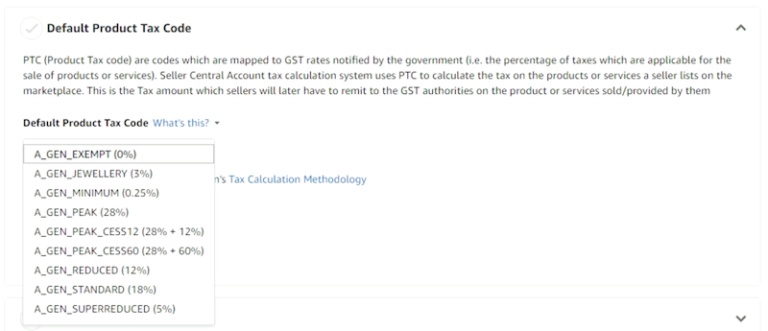
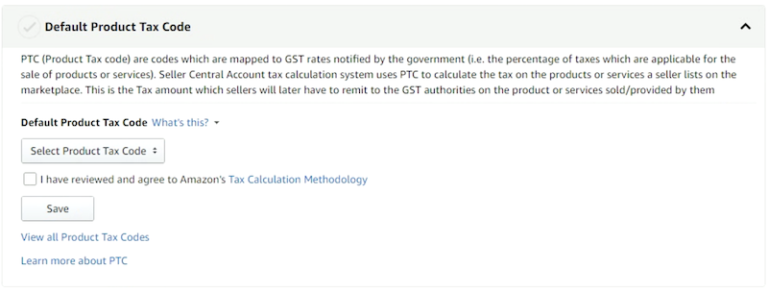
Once you are logged in for Amazon seller registration, you will see a dashboard where you can list your products, set shipping charges, set product default tax code, Add a signature as well as submit bank details and enter tax details.
1. List Your Product:
2. Set Shipping Fee Details

3. Submit Your Bank Account Details

4. Submit Tax Details

5. Set Default Product Tax Code
6. Add Signature

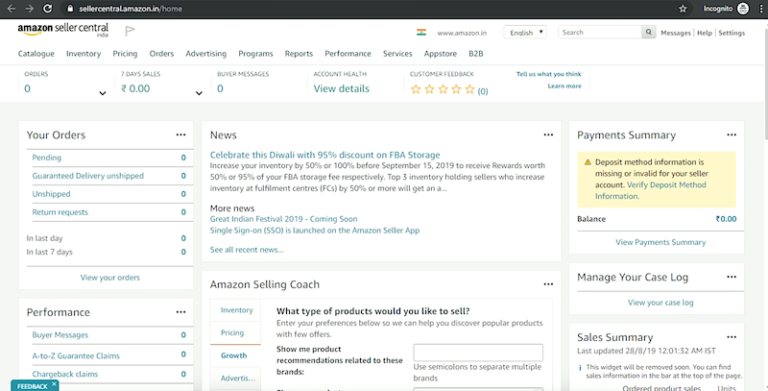
You have submitted all information for Amazon seller registration, click on launch your business and done. Then you will see your Amazon Seller Central dashboard.
How Much Does it Cost to Sell on Amazon Account?
For selling on Amazon you have to register on Amazon seller central. In this process you have to give your business details, GST/PAN number, and bank account information. After account verification, start your product listings with Amazon seller login. You have to pay some charges to sell on Amazon:
1. Selling Plan Charges
-
- Individual Plan – This is for those sellers who sell in small quantities.
- Professional Plan – If you want to sell in bulk then this is the best plan.
2. Referral Fees
There is a referral fee for every product category that Amazon takes on every sale. It is a selling price which depends on your selling price.
3. Closing Fees
Amazon charges a fixed closing fee on every order. This product varies on the basis of price and category.
4. Fulfillment and Shipping Fees
If you choose Amazon FBA (Fulfilled by Amazon), then Amazon will manage your product’s storage, packing, and delivery, but there will be a separate fee for this. If you do self-shipping, then you have to manage your own courier.
5. Advertising and Promotions
If you want to increase your product visibility, then you can use Amazon ads. This is a paid service which depends on your budget.
How to Perform Keyword Research for Amazon Products?
If you want your products to be sell on Amazon then it is important to use the right keywords. Because Amazon is a buyer-intent platform (people search here with the intention to buy), if you have used the right keywords then your product’s visibility and sales will increase.
What are Keywords?
Keywords are words and phrases which customers search on the Amazon search bar when they have to find the products on Amazon. These keywords help to optimize the listings of sellers so that their products should be visible in relevant searches and sales increases.
Just like SEO in Google, similarly Amazon has its own search engine A9 algorithm, which decides that which product will appear for which search query. If you use the right keywords for your listing (in search terms like title, description, bullet points, and backend), then your products can appear at the top of the search results and can increase your sales.
Why are Keywords important?
Keywords are very important on Amazon as it helps products to appear on search results, so that more people can reach your product. Here you will know why keywords are important:
-
- Better Visibility on Search Results – Using the right keywords make your product visible on top of the Amazon search.
- More Sales and Conversions – Keywords help to reach the right audience, which increases sales.
- Improve Ranking on Amazon SEO or A9 Algorithm – Keywords help in understanding the algorithm of Amazon, which improves the ranking.
- Chances to Stay Ahead from the Competition – With the use of the right keywords you can rank better from your competitors.
- Better Performance on Amazon Ads (PPC) – With the right keywords your ads reach a targeted audience, so that there is no obstruction of the budget.
What are the Benefits of Using Keywords?
We all know that keywords are very important for SEO. Their benefits are:
-
- Easy Amazon Seller Registration – With the use of the right keywords creating new Amazon seller account and listing products becomes easier.
- Better Search Ranking – If you want to sell on Amazon, then relevant keywords brings your product on the top of the search results.
- Increased Visibility – With the right optimization of your Amazon seller account helps your product reach more buyers.
- Higher Sales and Conversions – Right keywords help sellers of sell on Amazon to reach right buyers, which increase sales.
- Improved Amazon SEO (A9 Algorithm) – Keywords help Amazon’s algorithm to understand your Amazon seller account and relevancy of products.
- Competitive Advantage – After completing Amazon seller registration, with the use of the right keywords you can stay ahead from the competitors.
- Optimized Amazon Ads (PPC) – Ads from sell on Amazon keywords reach targeted audience, which improves ROI.
- Better Organic Traffic – With the proper keywords you can increase your organic traffic on your Amazon seller account without running ads.
- Cost-Effective Marketing – The best way to increase organic reach for free is by using the right keywords, which helps in selling on Amazon.
- Customer Intent Targeting – Keywords can help you reach buyers who are ready to purchase the products listed through your Amazon seller account.
What is Keyword Research?
Keyword Research is a process in which you identify what words or phrases people are searching, that are related to your product. When you use the right keywords in your Amazon listing, then your products are visible more on search results, which increases your sales and revenue.
Amazon is a search-driven platform, in which people search for their desired products and buy. If you have used relevant and high-ranking keywords in your listing, then your product will rank organically, and more people will reach your product.
There are two types of Amazon Keyword Research:
1. Keyword Research based on the ASIN (Amazon Standard Identification Numbers) – ASINs are the way to uniquely identify the products on Amazon. They are used to create a list of keywords that you can use to search for products that matches your search query.
2. Keyword Research based on the product category – The second type of keyword research is based on the product category, which allows you to get keywords that are more specific than just an ASIN number.
How to Perform Keyword Research on Amazon Website?
It is important to do keyword research on Amazon if you are selling on Amazon or have done Amazon seller registration. Using the right keywords will help your products rank higher in search results, and your sales will increase.
There are two types of keyword:
-
- Primary Keyword – Primary keyword is a very important keyword which describes your product and buyer searches for it. These are high search volume and relevance keywords which helps in improving ranking of Amazon A9 algorithm.
- Secondary Keyword – On Amazon, secondary keywords are those keywords which support primary keywords and make more relevant and discoverable product listing.
What is an ASIN on Amazon?
Full form of ASIN is Amazon Standard Identification Number. It is a 10-character alphanumeric code which gives every product an unique identity on Amazon. When you complete Amazon seller registration and want to start sell on Amazon, then every product generates a single ASIN.
If you are listing a new product on Amazon, then Amazon creates a new ASIN. But if you are selling any existing product, then you have to use the same ASIN which is already available.
Where to Find an ASIN Number on Amazon?
Here’s how you will find an ASIN (Amazon Standard Identification Number) on Amazon:
1. On the Product Page
-
- Go to Amazon’s website and search for the product you need.
- Click on the product listing to open the detailed product page.
- Scroll down to the “Product Details” or “Additional Information” section.
- Look for the ASIN, which is usually mentioned along with other product details like weight, dimensions, and model number.
- The ASIN is a 10-character alphanumeric code unique to each product.
2. In the Product URL
-
- Open the product page on Amazon for Amazon seller registration.
- Look at the URL in the address bar of your browser.
- Find the “/dp” or “/product” segment in the URL.
- The 10-character code after “/dp” or “/product” is the ASIN.
- Example:
- URL: https://www.amazon.com/dp/B09G3HRMVB/
- The ASIN is B09G3HRMVB.
- This method is quick and does not require scrolling down the page.
3. In Amazon Seller Central
-
- If you are a seller, log in to your Amazon seller central account.
- Navigate to the “Manage Inventory” section.
- Find your product in the list and check the ASIN column.
- You can also search for your product by name or SKU, and the ASIN will appear in the product details.
- This method is useful for sellers managing multiple products.
What is GTIN on Amazon?
GTIN (Global Trade Item Number) is an unique identification number which is used to identify any product globally. This is just like a barcode number, which is required for product tracking, listing, and selling on any retail or e-commerce platform.
Whenever any Amazon seller lists their product, then they have to provide a GTIN, which ensures that their product is authentic and already registered. With the help of GTIN, Amazon can classify any product correctly and prevent duplicate listings.
GTINs are of different types on Amazon, which depends on product category and country. Given below some common GTIN types:
1. UPC (Universal Product Code)
-
- It is a 12-digit barcode number which is mostly used in the USA and Canada.
- It is the most common GTIN for retail and ecommerce platforms.
- There is a requirement of UPC for many products on Amazon.
2. EAN (European Article Number)
-
- It is a 13-digit barcode number which is used in Europe and international markets.
- UPC or EAN both are almost similar, only EAN contains an extra one digit.
- These codes are mostly used in Amazon Europe and UK marketplaces.
3. ISBN (International Standard Book Number)
-
- It is a 10 or 13 digits unique number which is used for books and publications.
- If you want to sell books on Amazon, then you have to give an ISBN number.
What is Product ID in Amazon GTIN?
If you want to sell on Amazon, then you will need a product ID for your product. This product ID is a unique identification number which gives your product a unique identity in Amazon’s catalogue system.
When you do Amazon Seller Central login and enter your product data, then Amazon asks for GTIN so that your product can be properly stored in Amazon’s cataloging system.
Do You Need a GTIN to Sell on Amazon?
Yes, you need a GTIN to sell on Amazon. A GTIN is a Global Trade Item Number, which is a unique identifier that lets you identify an item across different markets. It’s used by retailers like you to keep track of your products and inventory so that they can track sales data and make sure they’re meeting their goals for Amazon seller registration. If you don’t have a GTIN, Amazon won’t be able to track your products – this means losing out on key information about how many units are selling and your products are selling at the right place.
How to Get a GTIN Number on Amazon?
-
- Go to the Amazon website and log into your account.
- Now, go to the products page and locate the product you want to get a GTIN number for.
- Click on “Add a New item” below “Your Account”.
- Select “Product Details”, then click on “SKU”.
- Scroll down until you find the “GTIN” field, then enter the GTIN number from your device’s label data or barcode scanner.
How to Sell on Amazon Without GTIN?
If you want to sell a product without a GTIN, you’ll need to first apply for an exemption for Amazon seller registration. Here’s how:
- Do Amazon Seller Central Login
-
- Login to your Amazon Seller Central account.
- Search in help section
- Search “Apply for GTIN Exemption” and open the form.
- Select Brand and Product Category
- The product which you are selling, choose their brand and category. If your product is non-branded, then select “Generic”.
- Upload Product Images
- Amazon can ask for your product’s images for the proof. Product packaging and branding should be clear in images.
- Submit Request and Wait for Approval
- Amazon will review your request and if everything goes well, approval can be received in 24-48 hours.
What is Fulfillment by Amazon(FBA)?
Fulfillment by Amazon is that service which helps you to store, pack, ship, and deliver your products after the completion of Amazon seller registration. If you have registered your business through Amazon seller registration, then FBA is that tool which is very useful for your business to automate and scale.
How to use Fulfillment by Amazon(FBA)?
Step 1: Create Amazon Seller Account
First of all, you have to complete Amazon seller registration if you haven’t done it yet.
-
- Visit Amazon Seller Central: Create your seller account by going to Amazon seller central. In this, you have to provide your business and payment details.
- Choose a Selling Plan: On Amazon, you have to choose your selling plan – Individual or Professional. Professional plans provide more features and you have to give a monthly subscription fee.
Step 2: Enable Fulfillment by Amazon (FBA)
-
- Log into Amazon Seller Central: Log in your Amazon seller account.
- Go to FBA Section: Click on “Inventory” option from the seller central dashboard then select “Manage FBA Inventory” or “Fulfillment by Amazon” option.
- Set up FBA: To enable your account on FBA follow the setup process for “Fulfillment by Amazon”. This will make you understand the process of sending your products to Amazon’s fulfillment centers.
Step 3: List Your Products
-
- Create Product Listings: List your products on Amazon Seller Central for Amazon seller registration. If you are already selling any product on Amazon, then you can select it to fulfill it through FBA.
- Select FBA as Fulfillment Method: When you create a product, then you have to select the “Fulfilled by Amazon” option, so that Amazon can store and ship your products.
Step 4: Prepare Your Products for Shipment
-
- Product Labeling: FBA requires you to label your products according to Amazon’s requirements. You will get specific guidelines on Amazon Seller Central, in which you have to print the labels and stick them on your products.
- Packaging: Follow Amazon’s packaging guidelines. You have to pack your products well, so that it doesn’t get damaged.
Step 5: Ship Your Inventory to Amazon Fulfillment Centers
-
- Generate Shipping Plan: When you pack your products, create a Shipping Plan in Seller Central. Amazon will tell you which fulfillment center you need to send your products to Amazon seller registration.
- Ship Products to Amazon: Send your products to Amazon’s fulfillment centers according to the instructions in the shipping plan. Here you will need shipping labels and tracking information. Amazon’s system will give you proper guidelines.
Step 6: Monitor Your Inventory and Orders
-
- Track Inventory Levels: When your products reach Amazon’s fulfillment centers, you can track your inventory in Seller Central.
- Order Fulfillment: When a customer orders your product, Amazon automatically packs and ships your products.
Step 7: Customer Service and Returns – Amazon seller registration
-
- Customer Service: Amazon handles customer service on your behalf, such as returns, exchanges, and order issues. You do not need to respond to customer queries about your products.
- Returns Handling: If any product returns, then Amazon manages. Amazon will update you on returns, and the items will be automatically returned to your account.
Step 8: Optimize Your Listings and Marketing
-
- Optimize Product Listings: It is very important to optimize your product listings so that your products are more visible and can attract customers. Use keywords, clear product images, and strong descriptions.
- Amazon Advertising: You can promote your products using Amazon Advertising tools. Sponsored Ads, Amazon’s PPC (Pay-Per-Click) campaigns, help your products reach more customers.
What is Amazon Seller ID?
If you want to sell on Amazon, first of all you have to complete Amazon Seller Registration. When you create your account in Amazon Seller Central, Amazon assigns you a unique Seller ID. This Seller ID is used to track all the activities related to your seller account.
If you want to grow your business on Amazon, your Amazon Seller ID plays an important role. Whether you’re using the features of Amazon Seller Central, contacting Amazon Seller Support, or managing your business through third-party tools, you need your Seller ID.
How to Get an Amazon Seller ID?
If you’re looking to sell on Amazon, you’ll need to get a seller ID for Amazon seller registration. Here’s how to do it:
1. Visit Amazon Seller Central
-
- First of all, go to the official website of Amazon Seller Central.
2. Click on ‘Register Now’
-
- If you are a new seller, then click on the “Sign Up” or “Register Now” button.
- If you already have an account, then Sign In.
3. Choose Your Selling Plan
-
- In Amazon, there are two selling plans: Individual and Professional.
- Choose your plan according to your business for Amazon seller registration.
4. Enter Business and Personal Details
-
- Enter business name and address.
- Provide GST and Pan (If you are GST-exempt, you can apply for exemption).
5. Verify Your Mobile and Email
-
- Amazon will send an OTP on your registered mobile number and email ID, which you have to verify.
6. Complete Identity Verification – Amazon seller registration
-
- You have to verify your Aadhar card or Passport.
- Amazon may also ask you for video call verification.
7. Amazon Seller Account Activation
-
- When your account is successfully verified, then your Amazon Seller Central account gets activated.
- From here you will get your Amazon Seller ID.
Where to Find Amazon Seller ID?
If you’re an Amazon Seller, you probably have a Seller ID.
Here’s are the steps, if you don’t know where it is:
-
- Navigate to “Inventory”
- Select “Manage Inventory”
- Click on “Listing”
- Click on your “Seller Name” in the top right corner of the page
- Your Seller ID will be in the URL after “Seller”.
What is Amazon Selling Fees? – Amazon seller registration
-
- Amazon selling fees are the fees you pay when you sell your products on Amazon. Fees are charged depending on what type of products and how much you sell. If your item is sold by Amazon, then they take a commission of 35%, if you’re in Canada Amazon takes 25% commission.
- If you sell your products directly to customers through Amazon, then there’s no fees – but you have to pay the sales tax.
- If you want to list a product on Amazon but don’t want to use their marketplace, there’s a listing fee. The fee is based on how many products you’ve listed at once; it ranges from ₹85.91/product up to ₹34712.19/month.
What is Listing?
Listing on Amazon means uploading your product to sell on Amazon marketplace. When you list your product on Amazon for Amazon seller registration, you make your item available to potential customers so they can see and purchase it. Amazon is one of the most popular online marketplaces in the world, with over 300 million active users.
Amazon offers many benefits for users and merchants, including:
-
- Access to millions of products across the world.
- A wide range of payment options, including credit cards, cheques, and money orders.
- A dedicated customer service team is available 24 hours a day through phone, chat, or email.
How to Create a New Product Listing?
There are several steps to follow, while creating a new product listing but before that it is necessary to complete Amazon Seller Registration:
Step 1: Sign into Your Amazon Seller Account
- Go to Amazon Seller Central and log into your account.
- If you don’t have an account, click “Register Now” for creating.
Step 2: Go to “Inventory” and Select “Add a Product”
- After logging in, you’ll go to the Seller Central Dashboard.
- From the top menu, click on Inventory > Add a Product.
- From here you’ll be able to add a new product or find an existing one.
Step 3: Choose “Create a New Product Listing”
- You will see two options:
- “Create a new product listing” – This is for new users who haven’t listed any product before.
- “Sell Yours” – This is for adding an offer to an existing Amazon listing (if the product is already on Amazon).
- Select “Create a new product listing” for Amazon seller registration.
Step 4: Select the Correct Product Category
- Amazon will ask you to choose a category for your product of Amazon seller registration.
- Use the search bar through the list to find your product’s appropriate category (e.g., Electronics, Apparel, Home Goods).
Example: If you’re listing a mobile phone, you’d choose Electronics > Cell Phones & Accessories > Cell Phones.
Step 5: Fill in Product Details
Now you will enter key details about your product:
1. Product Name (Title)
-
- Example: “Apple iPhone 16, 128GB, Black”
2. Product Description
-
- Here, write a detailed description of your product, explaining its key features, benefits, and usage for Amazon seller registration.
3. Bullet Points
-
- Example:
- “5G Capable”
- “12MP Ultra Wide Camera”
- “128GB Storage”
- Example:
4. Product Images
-
- Main Image: A high-quality image with a white background. Amazon requires this to be at least 1000 x 1000 pixels for zoom functionality.
5. Product ID (UPC, EAN, ISBN)
-
- If it’s a branded product, use the UPC or EAN. You’ll need to enter this to uniquely identify the product.
6. Price
-
- Set the price you want to charge for the product. Be sure to check what your competitors are charging.
7. Quantity/Stock Level
-
- Input how many units you have in stock.
8. Shipping Options
-
- Choose whether you are fulfilling orders yourself (FBM) or using Amazon’s Fulfillment by Amazon (FBA) service.
Step 6: Set Variations (If Applicable)
-
- If your product has variations (e.g., size, color) you can create them here.
- Example: T-shirt with size and color options:
- Size: Small, Medium, Large
- Color: Red, Blue, Green
You’ll need to select the right variation attributes and input them in the given sections.
Step 7: Set Up Keywords and Search Terms
-
- Add backend keywords to help customers find your product.
- These are terms that people might search for but aren’t visible to customers.
Step 8: Review and Submit
-
- Before finalizing the listing, review all the information you entered to ensure it’s correct.
- If everything looks good, click “Save and Finish” to submit your listing.
Step 9: Manage Your Listing
-
- After your product is live, you can manage it via your Seller Central dashboard for Amazon seller registration. Here, you can:
- Update your listing.
- Respond to customer reviews.
- Monitor your sales performance.
- After your product is live, you can manage it via your Seller Central dashboard for Amazon seller registration. Here, you can:


